


In order to that customize Neo-vim according to our requirements, we first need to create a init.lua file. This file will be the configuration file for Neo-vim, and whatever customization that is linked to the init.lua file, will reflect in Neo-vim.
Prerequisites:
- Neo-vim 0.5+
- Lua
Lua:
Lua is a Brazilian scripting language that was developed at Tecgraf in PUC-Rio in the year 1993. It is known to be lightweight, powerful, efficient, and embeddable, capable of supporting various programming styles, such as object-oriented programming, functional programming, etc.
Neo-vim has high integration for Lua since the language is easier to understand than VimScript, and more modular. More than that, it is more powerful than VimScript, giving it an overall easier experience for creating and customizing plugins
Creating the init.lua file:
The first step of the configuration will be to create the init.lua file, which should be placed in the nvim folder inside the .config directory as shown below. The file can be created either via GUI using right-click, or via TUI, using the touch command, as shown below.
touch .config/nvim/init.lua
Now that the file has been created, let's start configure some basic settings in Neo-vim.
Basic configurations:

If you examine this screenshot, you will notice that the width of space is 8 characters in the second line. That is the length of the tab width. Let's change it to 4 characters.
In order to change the length, we add the following commands in the init file:
vim.bo.shiftwidth = 4
vim.cmd [[set number]]
The first command sets the tab width to 4, and the second command enables line numbers in Neo-vim.
Note: the second command is essentially translating the vim command in order for Lua to understand
In the below image, the changes can be noticed, I.e., tab width and line number:

As we have the basic configurations set, let's move on to keymapping.
Keymapping:
Before we get started with keymapping, lets understand what it is.
What is Keymapping:
Keymapping is a process that allows us to create shortcuts to specific actions using a combination of keys on the keyboard, allowing for a more convenient and faster experience when using the text editor.
Implementation of keymapping:
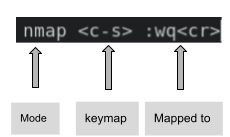
In order to implement it, first let's see the format to do so. In vimscript, the format is relatively straight-forward, where we start
- by specifying the mode in which the command is applicable,
- then enter the desired keymap,
- The command the keymap is mapped to,
- And finally, the options
However, since we are using Lua, we need to use a vim api in order to configure the keymaps in the lau file
In order to use the vim keymap api, we need to assign it to a variable:
local keymap = vim.api.nvim_set_keymap
After assigning the variable, we can then start mapping commands to the required key combinations.
keymap('i','<c-w>','<esc>:w<cr>',{})
keymap('n','<c-w>',':w<cr>',{})
keymap('n','<c-q>',':wq<cr>',{})
keymap('n','<c-s>',':source %<cr>',{})

keymap('n','<c-j>','<c-w>j',noremap)
keymap('n','<c-k>','<c-w>k',noremap)
keymap('n','<c-h>','<c-w>h',noremap)
Packet Management
Just as we have packet manager for VimScript, such as Vim-plug, pathogen and vundle, there are packet managers for Lua as well. Let’s find out how to install the packets using the packet manager, Packer.
Note: before proceeding, ensure that you have Lua installed on you’re machine as Packer commands will not be recognized without Lua.
Click on the link mentioned above, and you will be directed to the Git repository. In the webpage, there will be a comprehensive guide as to how to clone the repo.
*On arch systems, Packer is available in the AUR. It can be installed by using the ‘yay’ packet manager
Once the repo is cloned, add the following code into the init.lua file
require('packer').startup(function()

    use'wbthomason/packer.nvim'

end)
And run the following command:
:PackerSync
File Organizing:
Now that the functional topics of this article are covered, let’s try reorganizing the files as having all the configurations, keymaps and plugins in the same file will not only be confusing, but messy as well.
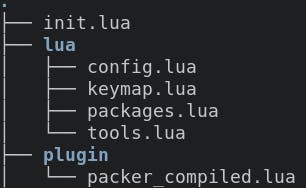
Now in order to link the required files to the init.lua file,
simply add the following lines to init.lua file:
require('keymap')
require('config')
require('packages')
Depending on what you may have named each file, accordingly add the names with the brackets.
Summary:
This article covers the basics of creating an init.lua file for Neovim, with basic configuration, keymaps and plugins. While this may work for some, it may not work for others. Hope it will be useful for those who wish to set up neovim using Lua